
15 Best hikes in Arches National Park
Arches National Park Hikes: One of the best ways to see Arches National Park is to go hiking! This list of the best hikes in Arches National Park has something for every one and every fitness level including family friendly hikes in Arches.
Visit Arches to see a landscape unlike any other in the world, with contrasting hues, land formations, and textures. Over 2,000 natural stone arches, as well as hundreds of soaring pinnacles, gigantic rock fins, and massive balancing rocks, may be seen in the park. The formations of this red-rock wonderland will astound you, while the paths will refresh you and the sunsets will inspire you.
Thank you for supporting this website written by an American. This post may contain affiliate links. This means I earn a small commission on these links at no extra cost to you.
National Park Entrance Fees
To enter the National Parks, you’ll need to pay an entrance fee or have a National Parks Pass also known as American the Beautiful Pass.
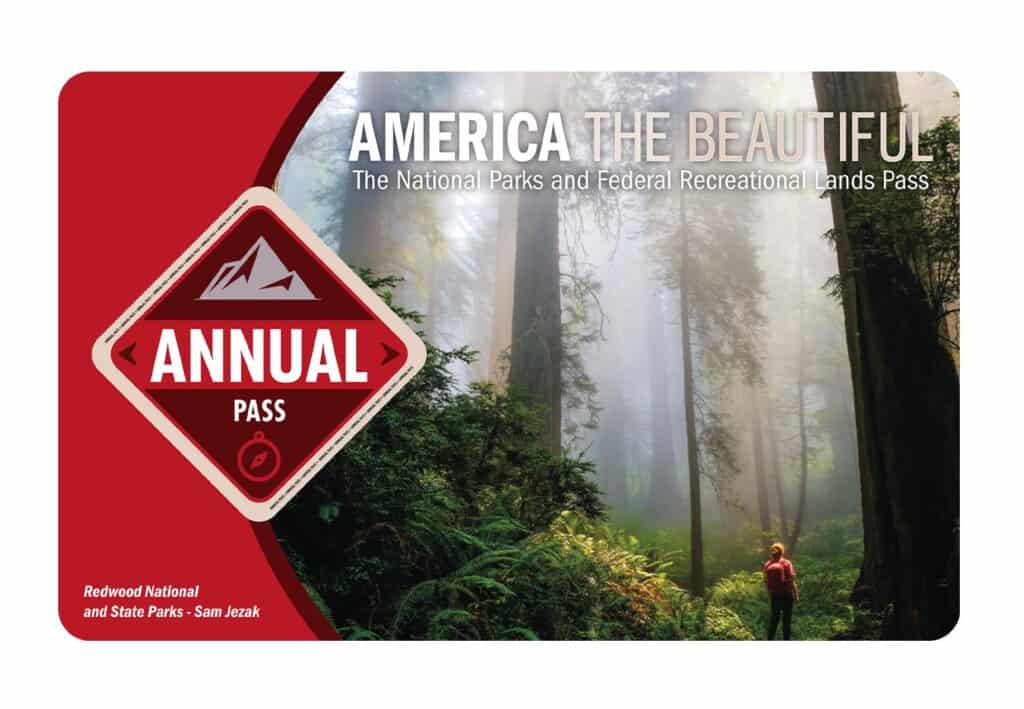
It costs $80 for a yearly America the Beautiful Pass. This gives you access to all national parks and federal areas that charge fees. The America the Beautiful Pass is well worth it!
I purchased my first one in 2016 and it’s such a money-saver! Plus 10% of sale proceeds go to the National Park Foundation.
Tips for Visiting Grand Teton National Park
Grand Canyon National Park is perfect for outdoor enthusiasts. There is something for everyone on this list and for different fitness levels. Also, note that it is dry and hot (in the summer), and make sure you know what you are getting into before you start. Here are a few tips for visiting the Grand Canyon:
- Bring a reusable water bottle and lots of water! Remember you are in the sun and you will need to drink lots of water. I love my LifeStraw Filtered Water Bottle. I can refill this bottle anywhere and it comes with a carabiner to connect it to my daypack.
- Check the Weather – days over 100 degrees are very common. Make sure to check.
- Hiking boots or sandals that will protect your feet! I love good shoes. I need all the support and help I can get. I actually love these sandals for hiking and also love these hiking boots.
- Bring hiking poles for balance and to protect your knees. I know many experienced hikers (and even amateur ones) think that hiking poles are for old people who lose their balance. Actually, hiking poles can help when going down steep inclines or when scrambling over rocks. They are great to hike with even for the most experienced hiker.
- Wear a sunhat. I feel like this whole post is about how high you are in the mountains and how much closer you are to the sun but it is so true. At elevation, you are closer to the sun and more likely to burn. Wear sun protection such as a sun hat and sunscreen.
- Be aware of the wildlife. This is the Southwest and you will need to watch out for snakes and other wildlife such as moose or a bear. Please stay away from wildlife and do not feed them. I recommend carrying bear spray as well.
- Start Early – If you want to avoid the traffic and the heat you will need to start your hike early. That way it will be nice and cool and the smog will not affect you either.
- Leave no trace. If you are new to the concept of Leave No Trace it is all about preserving the environment to ensure it is in the same or better condition when you leave it. This means that you should stick to the trails and carry out everything that you carried in. This is a great explanation of the Leave No Trace principles!
- Water shoes are great for water hikes– If you don’t have a pair, I highly suggest it as they are affordable. I have an article on the pros and cons of several pairs of water shoes.
- Bring Bug Spray and a snack: Be sure to bring everything you need including a snack like a protein bar plus BUG SPRAY.
Where to stay near Grand Canyon National Park
The Grand Canyon makes for a great weekend escape. Fresh air, beautiful scenery and being in nature does a world of good for the soul. I recommend staying as close to the park as possible and even treating yourself with a cabin with a spa pool to relax at night.
- There are lots of fantastic Airbnbs near the Grand Canyon. I have made a list of the best airbnbs around the park wherever you decide to stay. You can also check out my post on Where to Stay near the Grand Canyon to find the perfect hotel for any budget.
If you are taking a road trip remember to reserve a car in advance using Discover Cars .
National Park Entrance Fees
To enter the National Parks, you’ll need to pay an entrance fee or have a National Parks Pass also known as American the Beautiful Pass.
It costs $80 for a yearly America the Beautiful Pass. This gives you access to all national parks and federal areas that charge fees. The America the Beautiful Pass is well worth it!
I purchased my first one in 2016 and it’s such a money-saver! Plus 10% of sale proceeds go to the National Park Foundation.
Tips for Visiting Grand Teton National Park
Grand Canyon National Park is perfect for outdoor enthusiasts. There is something for everyone on this list and for different fitness levels. Also, note that it is dry and hot (in the summer), and make sure you know what you are getting into before you start. Here are a few tips for visiting the Grand Canyon:
- Bring a reusable water bottle and lots of water! Remember you are in the sun and you will need to drink lots of water. I love my LifeStraw Filtered Water Bottle. I can refill this bottle anywhere and it comes with a carabiner to connect it to my daypack.
- Check the Weather – days over 100 degrees are very common. Make sure to check.
- Hiking boots or sandals that will protect your feet! I love good shoes. I need all the support and help I can get. I actually love these sandals for hiking and also love these hiking boots.
- Bring hiking poles for balance and to protect your knees. I know many experienced hikers (and even amateur ones) think that hiking poles are for old people who lose their balance. Actually, hiking poles can help when going down steep inclines or when scrambling over rocks. They are great to hike with even for the most experienced hiker.
- Wear a sunhat. I feel like this whole post is about how high you are in the mountains and how much closer you are to the sun but it is so true. At elevation, you are closer to the sun and more likely to burn. Wear sun protection such as a sun hat and sunscreen.
- Be aware of the wildlife. This is the Southwest and you will need to watch out for snakes and other wildlife such as moose or a bear. Please stay away from wildlife and do not feed them. I recommend carrying bear spray as well.
- Start Early – If you want to avoid the traffic and the heat you will need to start your hike early. That way it will be nice and cool and the smog will not affect you either.
- Leave no trace. If you are new to the concept of Leave No Trace it is all about preserving the environment to ensure it is in the same or better condition when you leave it. This means that you should stick to the trails and carry out everything that you carried in. This is a great explanation of the Leave No Trace principles!
- Water shoes are great for water hikes– If you don’t have a pair, I highly suggest it as they are affordable. I have an article on the pros and cons of several pairs of water shoes.
- Bring Bug Spray and a snack: Be sure to bring everything you need including a snack like a protein bar plus BUG SPRAY.
Where to stay near Grand Canyon National Park
The Grand Canyon makes for a great weekend escape. Fresh air, beautiful scenery and being in nature does a world of good for the soul. I recommend staying as close to the park as possible and even treating yourself with a cabin with a spa pool to relax at night.
- There are lots of fantastic Airbnbs near the Grand Canyon. I have made a list of the best airbnbs around the park wherever you decide to stay. You can also check out my post on Where to Stay near the Grand Canyon to find the perfect hotel for any budget.
If you are taking a road trip remember to reserve a car in advance using Discover Cars .
Tips for Visiting in Arches National Park
Zion is perfect for outdoor enthusiasts. There is a hike for everyone on this list and for different fitness levels. Also, note that it is dry and hot (in the summer), and make sure you know what you are getting into before you start. Here are a few tips for Zion hiking:
- Bring a reusable water bottle and lots of water! Remember you are in the sun and you will need to drink lots of water. I love my LifeStraw Filtered Water Bottle. I can refill this bottle anywhere and it comes with a carabiner to connect it to my daypack.
- Check the Weather – days over 100 degrees are very common. Make sure to check.
- Hiking boots or sandals that will protect your feet! I love good shoes. I need all the support and help I can get. I actually love these sandals for hiking and also love these hiking boots.
- Bring hiking poles for balance and to protect your knees. I know many experienced hikers (and even amateur ones) think that hiking poles are for old people who lose their balance. Actually, hiking poles can help when going down steep inclines or when scrambling over rocks. They are great to hike with even for the most experienced hiker.
- Wear a sunhat. I feel like this whole post is about how high you are in the mountains and how much closer you are to the sun but it is so true. At elevation, you are closer to the sun and more likely to burn. Wear sun protection such as a sun hat and sunscreen.
- Be aware of the wildlife. This is the Southwest and you will need to watch out for snakes and other wildlife such as moose or a bear. Please stay away from wildlife and do not feed them.
- Start Early – If you want to avoid the traffic and the heat you will need to start your hike early. That way it will be nice and cool and the smog will not affect you either.
- Leave no trace. If you are new to the concept of Leave No Trace it is all about preserving the environment to ensure it is in the same or better condition when you leave it. This means that you should stick to the trails and carry out everything that you carried in. This is a great explanation of the Leave No Trace principles!
- Water shoes are great for water hikes– If you don’t have a pair, I highly suggest it as they are affordable. I have an article on the pros and cons of several pairs of water shoes.
- Bring Bug Spray and a snack: Be sure to bring everything you need including a snack like a protein bar plus BUG SPRAY.
15 Awesome Hikes in Arches National Park, Utah
Delicate Arch
The hike to the delicate arch is three miles round trip, with the majority of it taking place on Slickrock. This is in the sun and can be very hot on hot spring and summer days. The trail becomes a path that goes along a ledge hugging a wall as you get closer to the arch, with a sheer drop-off on the outside edge, which some hikers may find frightening.
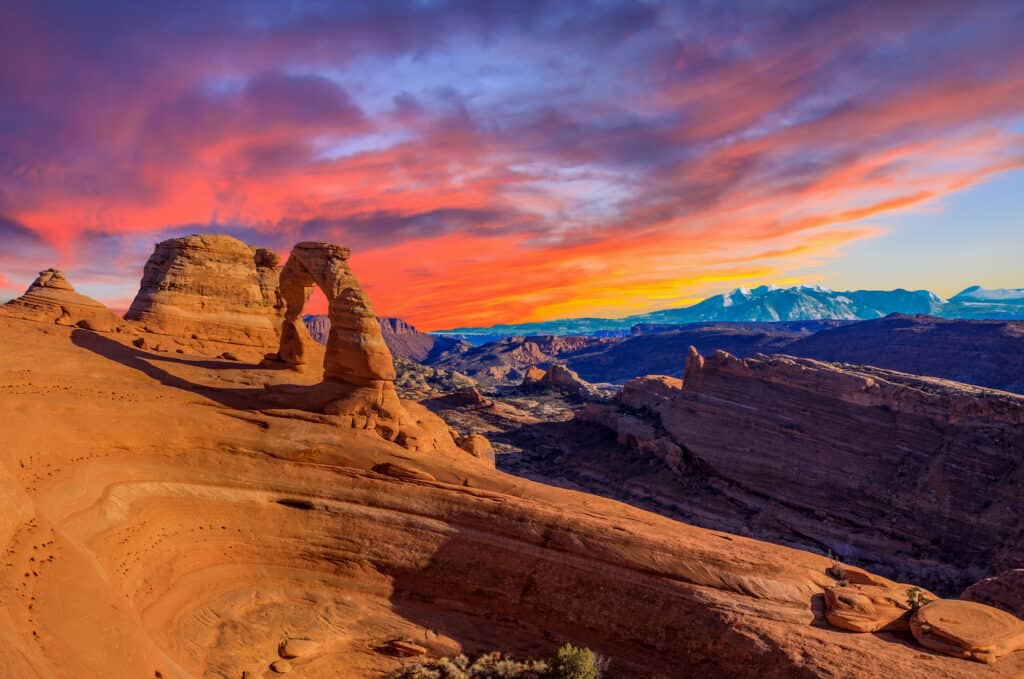
Delicate Arch is the park’s most photographed and unique arch. This freestanding arch, rather than being a window in the side of a rock wall, rises from the ground and frames the distant ridges and mountains.
You can trek to the arch for close-up views, but you can also see it from afar from the Delicate Arch Viewpoint on the road that runs beneath the arch.
The park’s temperature ranges from 65 to 85 degrees during the day in the spring and fall, with evenings being up to 30 degrees lower. Daytime temperatures in the summer often exceed 100 degrees, making morning and evening hikes preferred.
Any summer hike should include sunscreen and plenty of water. The trail is available all year, and you may take advantage of the near-complete seclusion in the winter. However, you should be warned that the trail, which can become slippery, may require the use of poles or shoe spikes.
Round trip to Landscape Arch: 1.6 miles
Length of Time: 1 hour
Double Arch is my favorite hike and arch in the park
The trail to Double Arch is short and accessible to all, making it ideal for families. The trail becomes a bit of a scramble at the base of the arch, and you might choose to wander up the boulders beneath the arches.
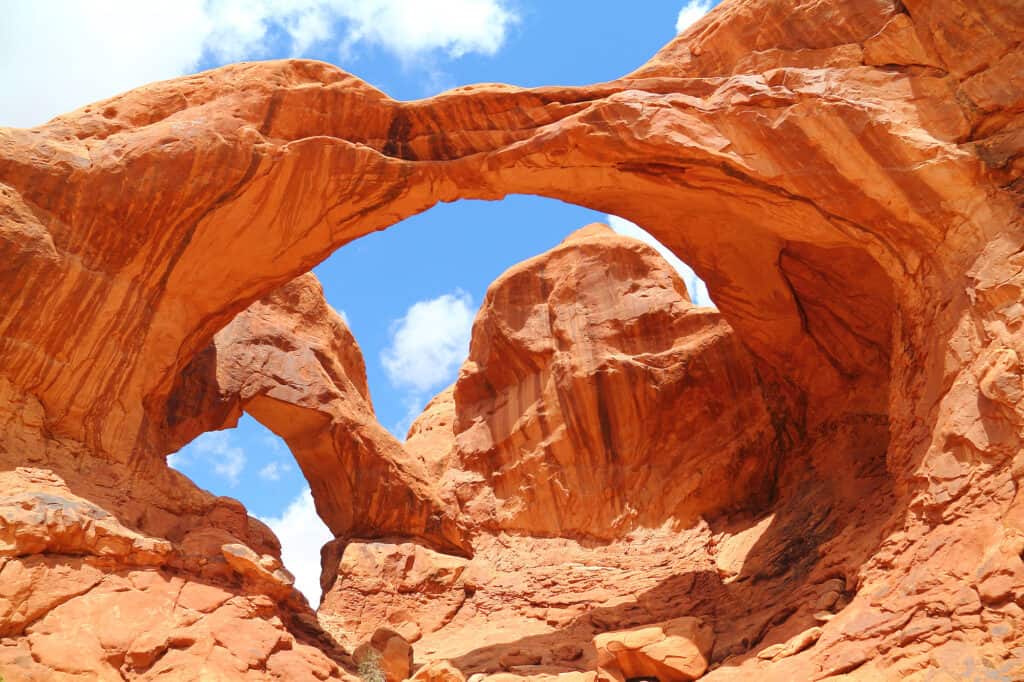
Double Arch is almost right across the road from the Windows parking area. The arch can be seen from the parking lot, but it’s even more amazing up close, where you can get a sense of its scale and see the sky streaming through the arches above.
Double Arch’s trail is a well-maintained 0.5-mile accessible from the Windows area’s parking lot. When you arrive at Double Arch, you have the option of climbing up to see the opposite side of the arch or exploring the bowl beneath it. You can also climb around in an open-cave-like structure for spectacular views from above.
This is my favorite area in the park. A double arch is just two arches at the same location.
It’s a simple hike that everybody can enjoy. In the afternoon, we went to Doubles Arch. It was incredibly hot outside, and because this was a short hike, we were able to sit in the shade and take it all in until we arrived at the top.
Round trip to Landscape Arch: 0.5 miles roundtrip
Length of Time: 10 minutes
Windows Loop
This 1.2-mile circle connects three of the park’s most beautiful arches. With its accessibility and short trail, as well as the concentration of formations in one location, this is one of Arches National Park’s most popular loop trails.
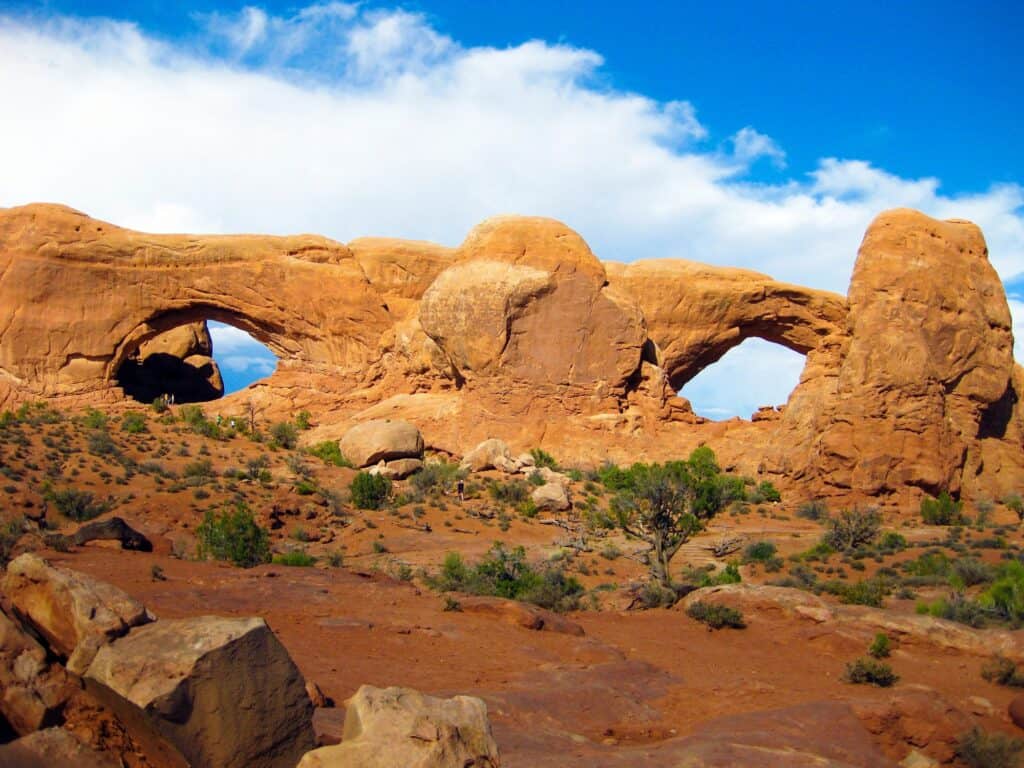
The park’s Windows section includes a lot of arches, so see who in your group can identify one first! The Windows may be seen from afar from the Balanced Rock viewpoint, but if you have time, it’s worth the short walk. The 1-mile gravel trail revolves around three designated rock formations: Turret Arch, North Window, and South Window, although there are likely to be many more along the way.
The first 100 yards of this trail are firm and packed level, and the National Park Service has designated it as barrier-free. The loop splits at one point, so take a more rustic route, stick to the gravel path, or reverse around and do both if you want to get more steps in.
Don’t be put off by the masses. This trail is less than a mile long and leads to both the North and South Windows. Climb in a clockwise direction for an easier climb. As its incline is spread out over a broader region, this is the easiest technique.
Distance: 0.7 miles round trip
Length of Time: 30 to 45 minutes
Turret Arch
Turret Arch is the smallest of the three arches you’ll see on the Windows Loop Trail, but it is part of a more intricate, castle-like rock formation that includes a spire. This formation has two openings, one that you can go through and one that is high up on the rock face. From inside the Turret Arch, there are nice views of the north and south Window Arches. Turret Arch is reached through a modest climb with only a few stairs.
Turret Arch gets its name from the fact that it has a tall spire on the side of a massive sandstone fin. Although the arch’s opening isn’t the highest or widest in comparison to others in the park, the structure as a whole has a castle-like appearance, making it one of the most stunning and stunning arches in the park.
On the same trail, Turret Arch is just past the North and South Windows. You’ll be able to view Turret Arch the entire trip, so simply keep walking in that direction. The walk has a gentle incline and some steps, but it is highly family-friendly. After seeing Turret Arch, return to the parking lot via the loop trail.
Take the Windows Loop in either way and seek for the Turret Arch turn off to get to Turret Arch from the Windows/Turret parking area. The leg leaving to the south – rightmost trail facing the rock formations would be the shortest, while the one departing north would be the longest: leftmost trail facing the rock formations.
However, because the Windows Loop is so enjoyable and short, it is highly advised that you complete the loop and all of its spurs.
Turret Arch is said to be best photographed in the early morning for the brightest color.
Distance: 0.7 miles round trip
Length of Time: 30 to 45 minutes
Devil’s Garden Loop is a great way to see several arches
The Devil’s Garden Primitive Loop is located at the park’s far end, where the main road ends. The walk is 7.2 miles long and includes eight arches as well as a beautiful rock landscape. This is one of the park’s more demanding hikes, with several Slickrock scrambles and exposed ledges.
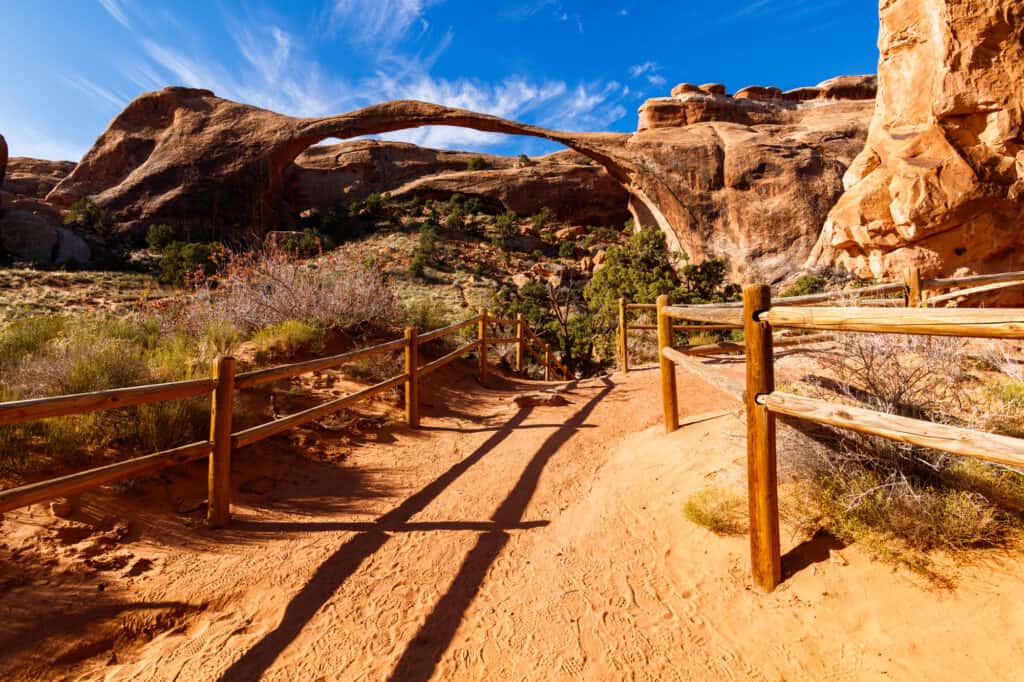
Landscape Arch is a 1.6-mile round-trip climb on relatively flat ground that spans more than the length of a football field. Navajo Arch and Partition Arch are both in the same location. The Devils Garden Trailhead is the starting point for each of these walks.
This trail may not be suitable for those who are afraid of heights. You don’t have to complete the entire loop, though, to enjoy some of the area’s attractions.
Devils Garden is unique in that it offers a variety of hikes based on your time and ability level. You’ll travel about 8 miles if you trek the entire loop, including a difficult Primitive Loop Trail part, and take each minor offshoot to reach all of the marked arches. However, you can simply do an out-and-back to a handful of interesting locations.
To walk a hard-packed path, begin at the Devils Garden trailhead. Landscape Arch, which stretches more than a football field in length, is.9 kilometers one-way. The terrain becomes steeper beyond this point, with several narrow ledges and drop-offs, and you can complete your hike at Double O Arch, for a 4.2-mile round-trip hike back to the trailhead.
Commit to the complete Devils Garden Loop if you’re up for a challenging hike that includes some scrambling on Slickrock. This contains the sites listed above, as well as an offshoot to the Dark Angel spire and the Primitive Loop Track, which will require you to look for cairns (short rock towers) to direct you through the less-developed trail.
Distance: 7.2 miles round trip
Length of Time: 2 hours
Skyline Arch
The Skyline Arch Trail is a short and simple hike that takes you less than a half-mile roundtrip from the parking lot to the trailhead. The arch is one of the Arches’ more well-known landmarks
For its location on the skyline, it makes for beautiful photos. With its proximity to the Devils Garden Campground, it’s an ideal hike for those who arrive late in the day and only have a few minutes to explore after camping.
The Skyline Arch Trail is short enough to be overlooked when arranging your Arches National Park schedule, but the spectacular rock span at the trail’s end is worth seeing.
In 1940, a massive slab of sandstone fell from Skyline Arch, tripling the arch’s size overnight, according to a panel at the trailhead. The arch is currently 71 feet broad and 33.5 feet tall. Boulders from the collapse are still visible beneath the arch today.
Take the well-kept single-track that runs parallel to the arch around the north end of a sandstone fin. You’ll come across boulders that have settled on the desert floor on the other side. To get a better view of Skyline Arch, either step back and take in the scenery or scramble up the rocks to the adjoining fin.
It is hard to approach from this side due to a precipitous drop on the sandstone cliff below the arch. There is, however, a trail that begins in Devils Canyon Campground and leads up the rear of Skyline Arch. You’ll know how they got there if you spot adventurous campers standing below the arch.
Pull off on Devils Garden Road from the roadside and head north on this level, well-defined track. Skyline Arch is less than a quarter-mile around the corner of a rock fin
Distance: 0.2 miles round trip
Length of Time: 20 minutes
Balanced Rock
This 128-foot-tall monolith appears to be on the verge that it could topple over at any moment! Balanced Rock is unique in that it can be seen totally from the park’s main road, so you don’t have to get out of your car to see it. However, with picnic tables and restrooms across from the parking lot and some lovely views of the snow-capped La Sal Mountains and The Windows rock formations in the distance, this area is also a good place to stretch your legs.
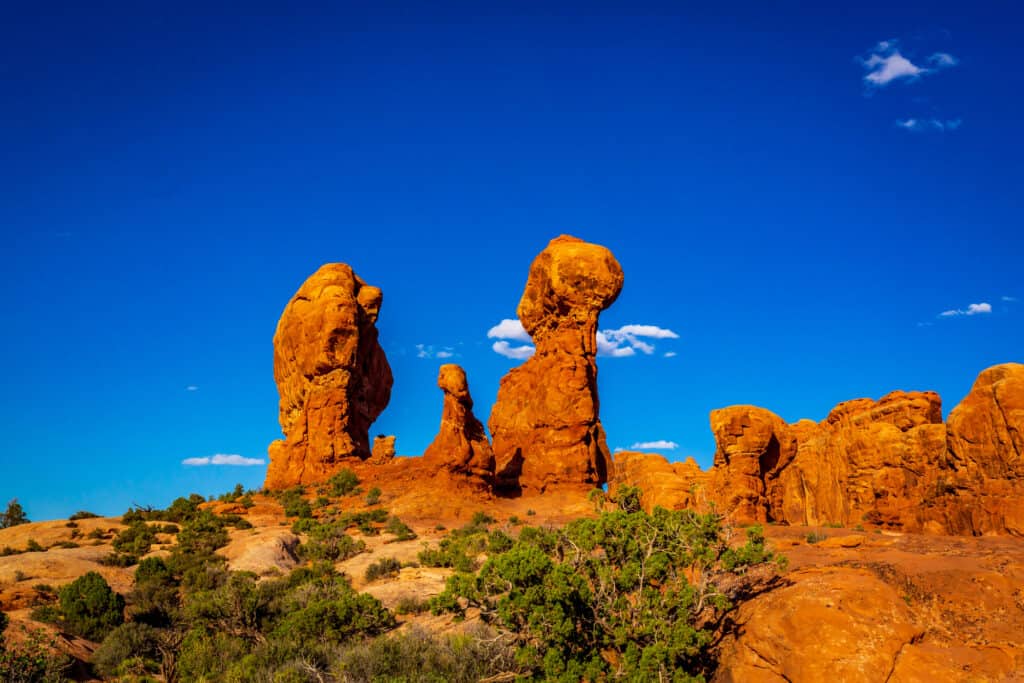
Balanced Rock is a massive boulder situated on a narrow pedestal, as its name suggests. Because there isn’t much else in this area, it stands out. The La Sal Mountains can be seen in the distance on a clear day.
Balanced Rock is surrounded by a short walking path that winds around and behind it, however, most visitors come to see the rock, which is close to the road and parking lot.
You don’t even have to leave the luxury of your car to see this attraction if you’re in a rush.
Distance: 0.3 miles round trip
Length of Time: 20 minutes
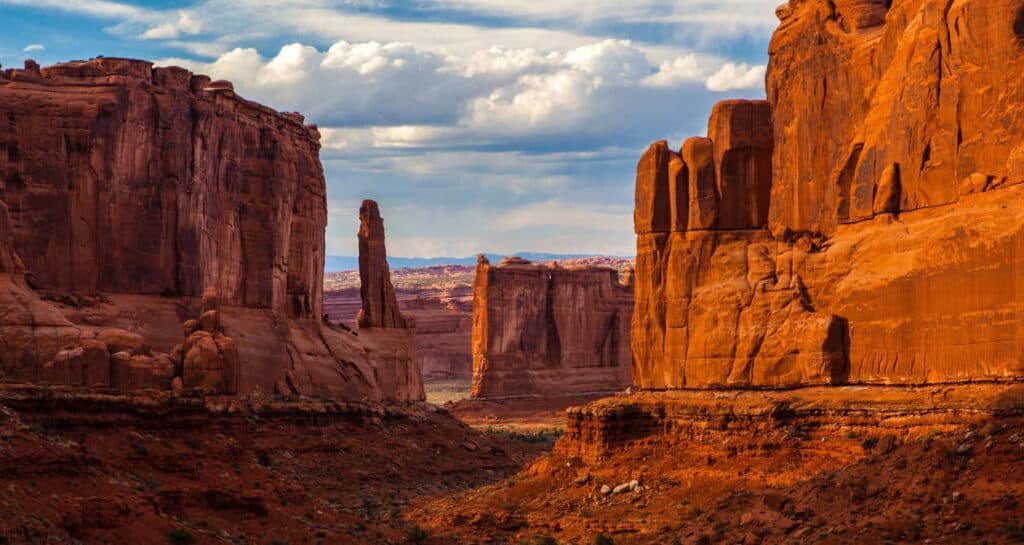
Park Avenue
The Park Avenue Trail is named after the iconic street in New York City. The name came about because of a likeness between these sandstone spires and the iconic buildings along New York’s Park Avenue. The primary distinction, of course, is that Arches National Park’s “skyscrapers” were fashioned by nature.
The Park Avenue trail is one of the most spectacular hikes in the park but does not showcase the park’s arches. Instead, the cliff walls and spires that loom above you as you travel down the valley floor are the highlights.
This hike is rated as moderate by the park. It’s one mile long, but you’ll have to turn around and go back along the same route unless you have a shuttle where the hike ends, making it a two-mile round-trip journey.
Although this shuttle trail can be started from either end, starting from the south end (Park Avenue) results in a completely downhill trip. Start at the north end of the park and have someone pick you up at the south end if you want to utilize this shuttle route as you depart the park.
The vistas are different in each direction, so tackling this as a return hike will not disappoint. The journey begins with a drop before winding its way among the massive rock walls that rise all around you. This route gives you a better idea of the size and height of the formations than the road provides.
Distance: 2.0 miles round trip
Length of Time: 45 minutes
Sand Dune Arch
With a stunning trail entrance through small rock fins and a stroll across deep sand to a lovely arch, Sand Dune Arch is a fun spot to explore.
With towering walls providing a tunnel illusion, the brief walk into and around the arch feels like a slot canyon. The sand in this area is distinctive, and it lends this arch its personality.
This is the ideal arch to visit with the kids. It’s only a 3-mile hike, so it’s doable for everybody. The bottom of the sandstone appears like a sandy beach, which will attract the children.
Children can enjoy playing in the sand and playing hide and seek in all the hidden crevices. Adults can also wander through the arch and up the wall behind, whereas, photographers will find plenty of ways to entertain themselves. With the fins streaming in the air like a wind tunnel, it can get extremely windy in here.
There’s also a route where you may find a pothole that fills up with water after a rainstorm. This is yet another excellent hike in Arches National Park.
Distance: 0.3 miles round trip
Length of Time: 20 minutes
Where to stay near Zion National Park
The Zion makes for a great weekend escape. Fresh air, beautiful scenery and being in nature does a world of good for the soul. I recommend staying as close to the park as possible and even treating yourself with a cabin with a spa pool to relax at night.
- There are lots of fantastic Airbnbs near Zion. I have made a list of the best airbnbs around the park wherever you decide to stay. You can also check out my post on Where to Stay near Zion
If you are taking a road trip remember to reserve a car in advance using Discover Cars .
Tips for Renting a car for your road trip
It’s awfully hard to get to Canyonlands National Park without a car. The closest airport is Las Vegas and you can use Discover Cars to rent a car for your travels. You’ll be able to pick up a car at any airport or in your hometown.
Check availability and get a quote for a rental car for your trip here.