
3 Days in Zion Itinerary – What to See, Do and Eat in Zion
Planning a Trip to Zion: Check out how to spend 3 days in Zion National Park! This Zion Itinerary will help you maximize your time in the park.
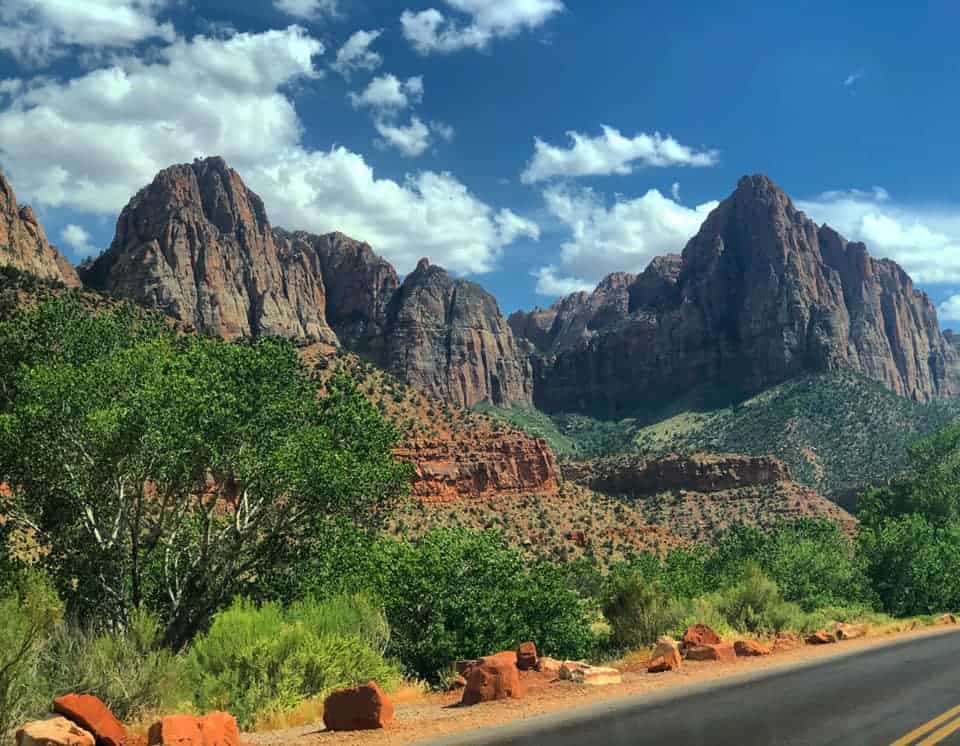
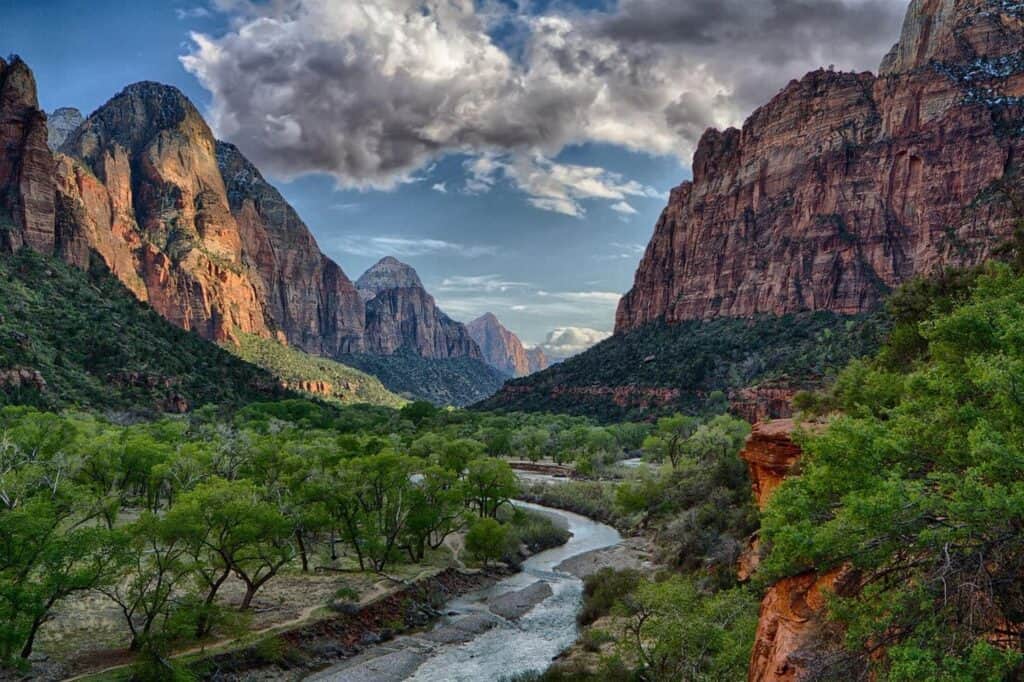
Three days at Zion National Park are ideal for experiencing some of the park’s best treks and sites. Here’s my agenda for a fun-filled day in Zion National Park.
Zion is Utah’s first and most popular National Park. Here are my other articles on Zion:
15 Best Glamping Spots Near Zion National Park
15 Best Airbnbs in Springdale near Zion National Park
Visiting Zion National Park in Winter – My Favorite Time to Visit
One Day in Zion National Park – How to Make the Most of Zion in One Day
15 Best Hikes in Zion National Park – you won’t want to miss!
15 Best Things to do in Zion National Park – You Won’t Want to Miss!
Thank you for supporting this website written by an American. This post may contain affiliate links. This means I earn a small commission on these links at no extra cost to you.
National Park Entrance Fees
To enter the National Parks, you’ll need to pay an entrance fee or have a National Parks Pass also known as American the Beautiful Pass.
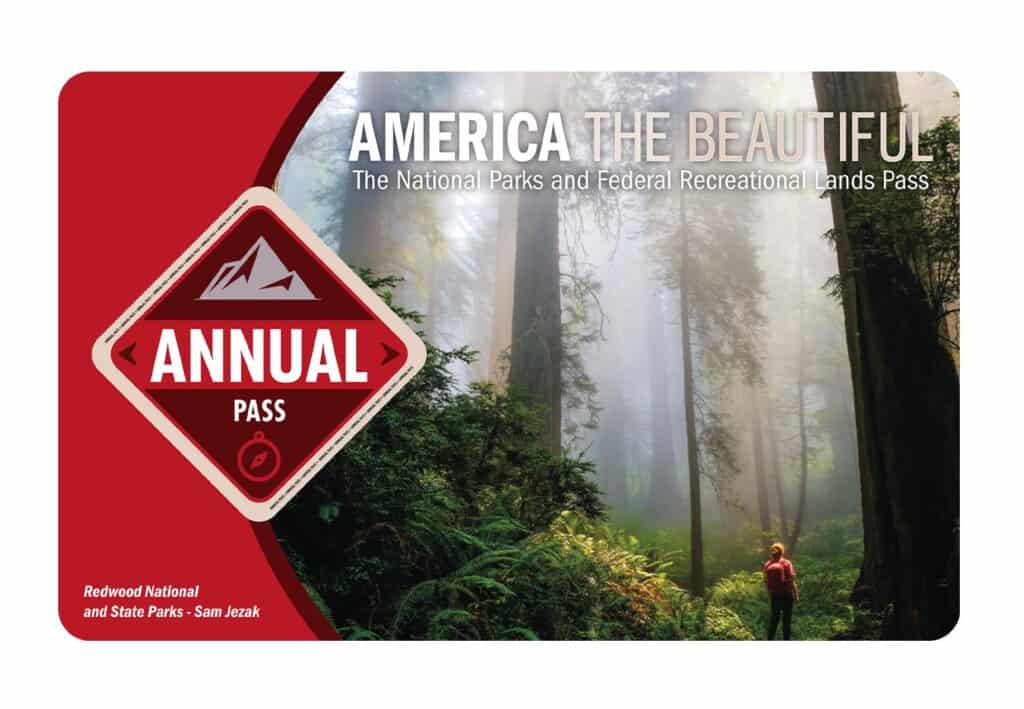
It costs $80 for a yearly America the Beautiful Pass. This gives you access to all national parks and federal areas that charge fees. The America the Beautiful Pass is well worth it!
I purchased my first one in 2016 and it’s such a money-saver! Plus 10% of sale proceeds go to the National Park Foundation.
Tips for Visiting Grand Teton National Park
Grand Canyon National Park is perfect for outdoor enthusiasts. There is something for everyone on this list and for different fitness levels. Also, note that it is dry and hot (in the summer), and make sure you know what you are getting into before you start. Here are a few tips for visiting the Grand Canyon:
- Bring a reusable water bottle and lots of water! Remember you are in the sun and you will need to drink lots of water. I love my LifeStraw Filtered Water Bottle. I can refill this bottle anywhere and it comes with a carabiner to connect it to my daypack.
- Check the Weather – days over 100 degrees are very common. Make sure to check.
- Hiking boots or sandals that will protect your feet! I love good shoes. I need all the support and help I can get. I actually love these sandals for hiking and also love these hiking boots.
- Bring hiking poles for balance and to protect your knees. I know many experienced hikers (and even amateur ones) think that hiking poles are for old people who lose their balance. Actually, hiking poles can help when going down steep inclines or when scrambling over rocks. They are great to hike with even for the most experienced hiker.
- Wear a sunhat. I feel like this whole post is about how high you are in the mountains and how much closer you are to the sun but it is so true. At elevation, you are closer to the sun and more likely to burn. Wear sun protection such as a sun hat and sunscreen.
- Be aware of the wildlife. This is the Southwest and you will need to watch out for snakes and other wildlife such as moose or a bear. Please stay away from wildlife and do not feed them. I recommend carrying bear spray as well.
- Start Early – If you want to avoid the traffic and the heat you will need to start your hike early. That way it will be nice and cool and the smog will not affect you either.
- Leave no trace. If you are new to the concept of Leave No Trace it is all about preserving the environment to ensure it is in the same or better condition when you leave it. This means that you should stick to the trails and carry out everything that you carried in. This is a great explanation of the Leave No Trace principles!
- Water shoes are great for water hikes– If you don’t have a pair, I highly suggest it as they are affordable. I have an article on the pros and cons of several pairs of water shoes.
- Bring Bug Spray and a snack: Be sure to bring everything you need including a snack like a protein bar plus BUG SPRAY.
Where to stay near Grand Canyon National Park
The Grand Canyon makes for a great weekend escape. Fresh air, beautiful scenery and being in nature does a world of good for the soul. I recommend staying as close to the park as possible and even treating yourself with a cabin with a spa pool to relax at night.
- There are lots of fantastic Airbnbs near the Grand Canyon. I have made a list of the best airbnbs around the park wherever you decide to stay. You can also check out my post on Where to Stay near the Grand Canyon to find the perfect hotel for any budget.
If you are taking a road trip remember to reserve a car in advance using Discover Cars .
National Park Entrance Fees
To enter the National Parks, you’ll need to pay an entrance fee or have a National Parks Pass also known as American the Beautiful Pass.
It costs $80 for a yearly America the Beautiful Pass. This gives you access to all national parks and federal areas that charge fees. The America the Beautiful Pass is well worth it!
I purchased my first one in 2016 and it’s such a money-saver! Plus 10% of sale proceeds go to the National Park Foundation.
Tips for Visiting Grand Teton National Park
Grand Canyon National Park is perfect for outdoor enthusiasts. There is something for everyone on this list and for different fitness levels. Also, note that it is dry and hot (in the summer), and make sure you know what you are getting into before you start. Here are a few tips for visiting the Grand Canyon:
- Bring a reusable water bottle and lots of water! Remember you are in the sun and you will need to drink lots of water. I love my LifeStraw Filtered Water Bottle. I can refill this bottle anywhere and it comes with a carabiner to connect it to my daypack.
- Check the Weather – days over 100 degrees are very common. Make sure to check.
- Hiking boots or sandals that will protect your feet! I love good shoes. I need all the support and help I can get. I actually love these sandals for hiking and also love these hiking boots.
- Bring hiking poles for balance and to protect your knees. I know many experienced hikers (and even amateur ones) think that hiking poles are for old people who lose their balance. Actually, hiking poles can help when going down steep inclines or when scrambling over rocks. They are great to hike with even for the most experienced hiker.
- Wear a sunhat. I feel like this whole post is about how high you are in the mountains and how much closer you are to the sun but it is so true. At elevation, you are closer to the sun and more likely to burn. Wear sun protection such as a sun hat and sunscreen.
- Be aware of the wildlife. This is the Southwest and you will need to watch out for snakes and other wildlife such as moose or a bear. Please stay away from wildlife and do not feed them. I recommend carrying bear spray as well.
- Start Early – If you want to avoid the traffic and the heat you will need to start your hike early. That way it will be nice and cool and the smog will not affect you either.
- Leave no trace. If you are new to the concept of Leave No Trace it is all about preserving the environment to ensure it is in the same or better condition when you leave it. This means that you should stick to the trails and carry out everything that you carried in. This is a great explanation of the Leave No Trace principles!
- Water shoes are great for water hikes– If you don’t have a pair, I highly suggest it as they are affordable. I have an article on the pros and cons of several pairs of water shoes.
- Bring Bug Spray and a snack: Be sure to bring everything you need including a snack like a protein bar plus BUG SPRAY.
Where to stay near Grand Canyon National Park
The Grand Canyon makes for a great weekend escape. Fresh air, beautiful scenery and being in nature does a world of good for the soul. I recommend staying as close to the park as possible and even treating yourself with a cabin with a spa pool to relax at night.
- There are lots of fantastic Airbnbs near the Grand Canyon. I have made a list of the best airbnbs around the park wherever you decide to stay. You can also check out my post on Where to Stay near the Grand Canyon to find the perfect hotel for any budget.
If you are taking a road trip remember to reserve a car in advance using Discover Cars .
Where to stay near Zion National Park
The Zion makes for a great weekend escape. Fresh air, beautiful scenery and being in nature does a world of good for the soul. I recommend staying as close to the park as possible and even treating yourself with a cabin with a spa pool to relax at night.
Because there is minimal lodging in the park, visitors to Zion usually stay in Springdale, a small town near the south gate. The Springdale Shuttle connects Springdale to the Zion Visitors Center and the Zion Shuttle, making it just as convenient to stay close to Zion while also providing more dining alternatives.
- There are lots of fantastic Airbnbs near Zion. I have made a list of the best airbnbs around the park wherever you decide to stay. You can also check out my post on Glamping near Zion National Park
If you are taking a road trip remember to reserve a car in advance using Discover Cars .
Shuttle Tip: The main Zion Canyon is only accessible via shuttle bus. Many of the treks, including Scout Lookout, Angels Landing, Riverside Walk, the Narrows, and the Upper Emerald Pool, have trailheads along the Shuttle Bus route.
How to get around – Zion Shuttle
The Zion Shuttle runs for most of the year, from mid-March to November. Private vehicles are not permitted to drive on Zion Canyon Scenic Drive during this time. To get to the main entrance, park at the Visitor Center or ride the Springdale Shuttle. You can take the shuttle to the Temple of Sinawava from the Visitor Center. If you’re going hiking in the park, be sure you know where to catch the shuttle for your hike.
Lines to board the Zion Shuttle car began to form around mid-morning. Plan to be on one of the first two shuttles of the day for the finest experience and arrive 30 minutes before the first shuttle during peak season and holiday weekends. It’s early, but if you’re going to hike Angels Landing, going early will provide you with a much better experience as you’ll be able to hike the chain part without having to deal with two-way traffic. It’s well worth the arduous start!
All year, you are allowed to drive from the Visitor Center to the east entrance. You are permitted to drive along Zion Canyon Scenic Drive when the shuttle is not operating (December, January, and February). Just be aware that parking is restricted, so getting an early start is recommended. The Springdale Shuttle, a second shuttle system, connects the hotels in Springdale with Zion’s main gate.
The shuttle service in Zion is normally fairly efficient, though you may need to allow extra time to queue on the busiest days of the park.
Tips for Visiting in Zion National Park
Zion is perfect for outdoor enthusiasts. There is something for everyone on this list and for different fitness levels. Also, note that it is dry and hot (in the summer), and make sure you know what you are getting into before you start. Here are a few tips for Zion hiking:
- Bring a reusable water bottle and lots of water! Remember you are in the sun and you will need to drink lots of water. I love my LifeStraw Filtered Water Bottle. I can refill this bottle anywhere and it comes with a carabiner to connect it to my daypack.
- Check the Weather – days over 100 degrees are very common. Make sure to check.
- Hiking boots or sandals that will protect your feet! I love good shoes. I need all the support and help I can get. I actually love these sandals for hiking and also love these hiking boots.
- Bring hiking poles for balance and to protect your knees. I know many experienced hikers (and even amateur ones) think that hiking poles are for old people who lose their balance. Actually, hiking poles can help when going down steep inclines or when scrambling over rocks. They are great to hike with even for the most experienced hiker.
- Wear a sunhat. I feel like this whole post is about how high you are in the mountains and how much closer you are to the sun but it is so true. At elevation, you are closer to the sun and more likely to burn. Wear sun protection such as a sun hat and sunscreen.
- Be aware of the wildlife. This is the Southwest and you will need to watch out for snakes and other wildlife such as moose or a bear. Please stay away from wildlife and do not feed them.
- Start Early – If you want to avoid the traffic and the heat you will need to start your hike early. That way it will be nice and cool and the smog will not affect you either.
- Leave no trace. If you are new to the concept of Leave No Trace it is all about preserving the environment to ensure it is in the same or better condition when you leave it. This means that you should stick to the trails and carry out everything that you carried in. This is a great explanation of the Leave No Trace principles!
- Water shoes are great for water hikes– If you don’t have a pair, I highly suggest it as they are affordable. I have an article on the pros and cons of several pairs of water shoes.
- Bring Bug Spray and a snack: Be sure to bring everything you need including a snack like a protein bar plus BUG SPRAY.
Three Day Zion Itinerary – Best Things to do
Day 1 in Zion National Park
Riverside Walk
The Riverside Walk, formerly known as The Gateway to the Narrows, is one of Zion’s best family-friendly trails. For about a mile, the trail follows the lovely Virgin River to the mouth of the famous Zion Narrows.
This paved trail is ideal for children and adults of all ages and abilities. Wheelchair users will enjoy this walk as well but may require assistance.
It begins at the Temple of Sinawava, at the far end of Zion Canyon’s generally accessible portion. During the day, cottonwood trees shade the majority of the trail, providing a pleasant shade that is complemented by the cool waters of the North Fork of the Virgin River.
Many of Zion’s exotic species of wildlife can be found in the hanging gardens along the trail’s sloped walls, which are fed by trickling waterfalls. The entrance to the Narrows is at the end of the climb, and most hikers who take the time to stroll down the Gateway spend at least a half-hour or more wading around in the Narrows’ mouth.
The Riverside Walk is a great place to catch a glimpse of the local Zion wildlife. Lizards, birds, and some unusually friendly squirrels are common along the trail. Mule deer sightings are also common, especially in the evening. Keep a safe distance from all wildlife and never feed them.
The Narrows
The Narrows is still one of the most popular and memorable hiking destinations. The Narrows, however, unlike the other paths in Zion National Park, takes some specific planning, preparation, and equipment to enjoy.
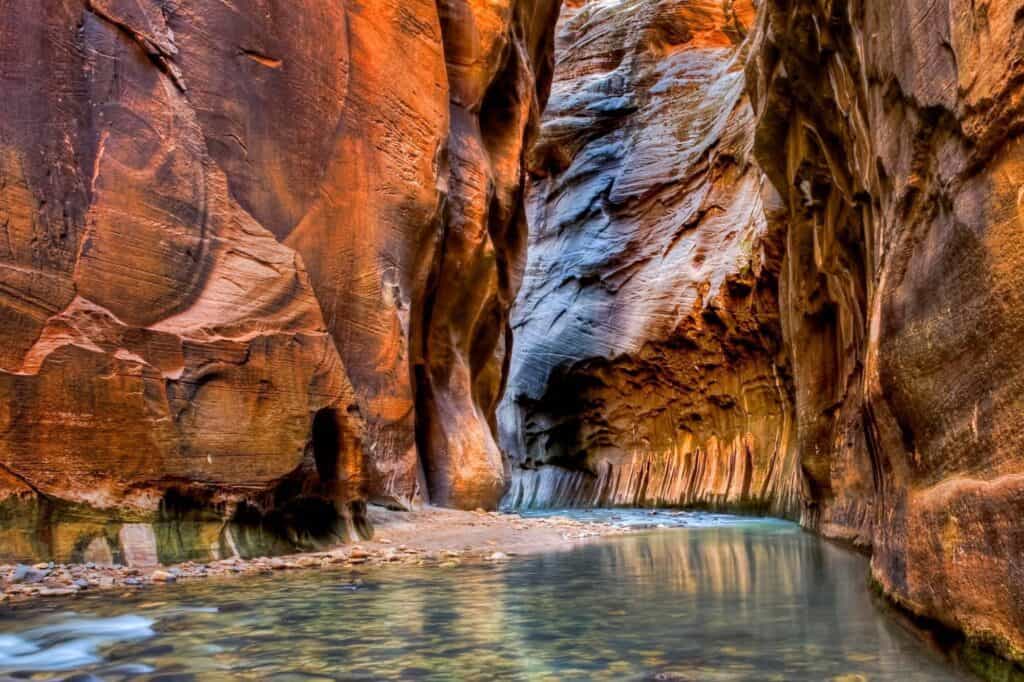
This can be reached by either Zion Canyon or Chamberlain’s Ranch, and regardless of whatever way you take, you’ll get the unique and enjoyable experience of strolling through the river while surrounded by wild canyon walls.
Starting at Zion Canyon and taking the park shuttle to stop #9, the Temple of Sinawava is the most popular way to hike The Narrows. Hiking the Narrows from the bottom up is known as “bottom-to-top” hiking, and it does not require a wilderness permit.
Beginning along a riverside trail before entering the Narrows, you can hike up to 5 miles each way, to Big Spring and back, without needing a permit.
You’ll want to enter the river at the end of this walkway and walk through the water to enjoy the complete Narrows experience! Hiking into the Narrows for 3-4 miles (one way) to the famed Wall Street section is recommended.
Hiking from the top down is another option. This route begins outside the park, at Chamberlain’s Ranch, which is about an hour and a half drive from the park. This path requires a permit, which can be difficult to obtain during peak season, and permits are not issued if the Virgin River’s flow is too high.
Hiking the Narrows is an awesome experience, especially because of the unique terrain and, of course, Zion’s grandeur. Hiking the Narrows with a guide is recommended for individuals who don’t want to miss out on this experience but have never done a hike like this before.
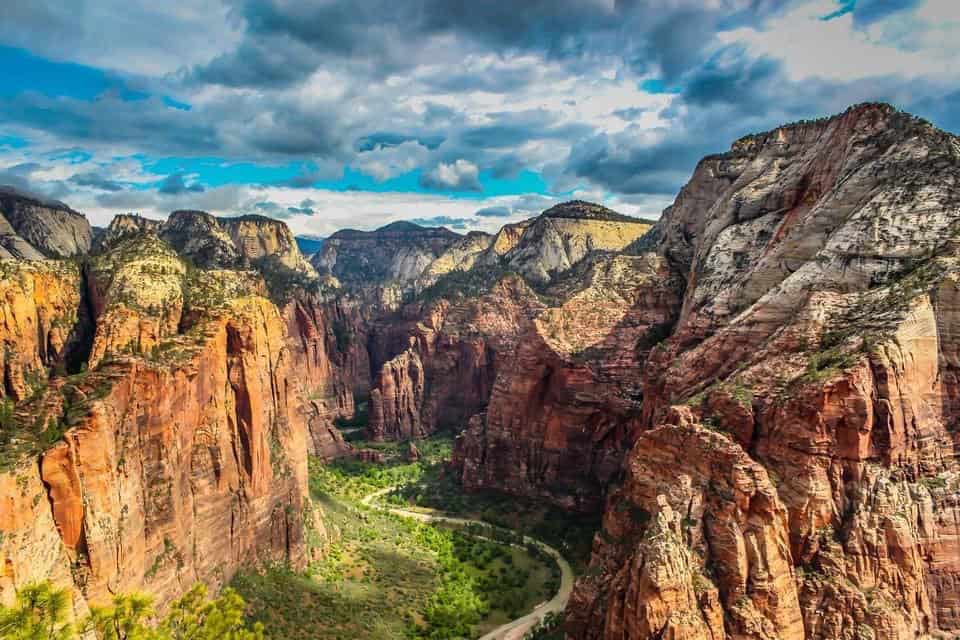
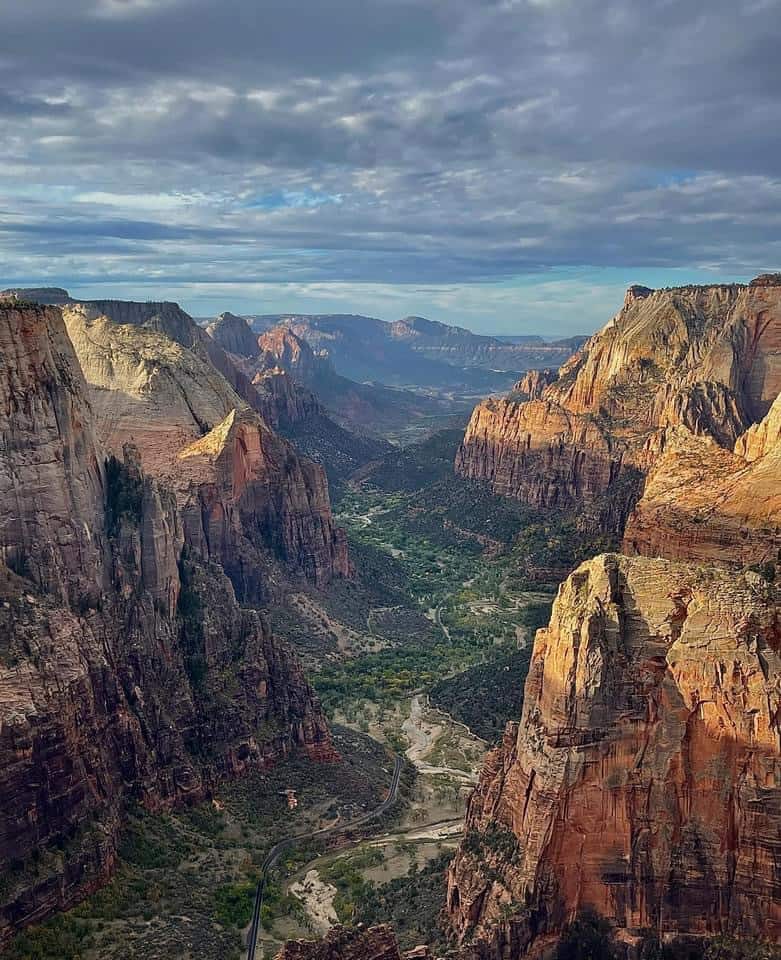
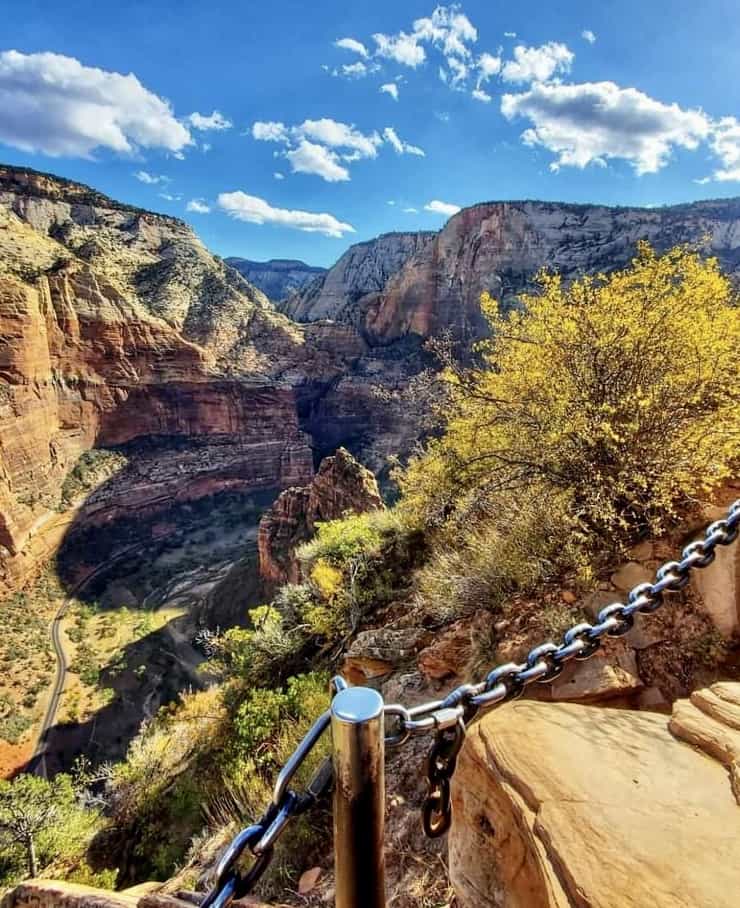
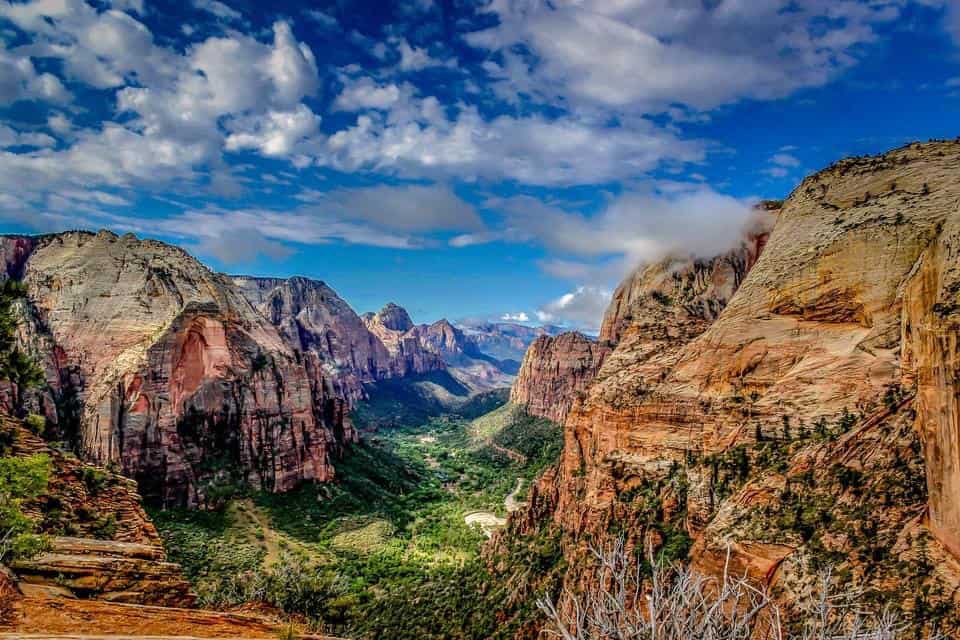
Observation Point
Observation Point is near the Narrows and Angels Landing in Zion Canyon’s north end. Due to a rockslide, you can no longer access this trail from the canyon, forcing you to travel outside of the park to see this iconic and spectacular view.
At 6,521 feet above sea level, Observation Point offers a panoramic view of Zion Canyon, including the popular Angels Landing, The Organ, Great White Throne, and the lower Zion Canyon with the Virgin River running through it.
This eight-mile round-trip climb is one of the greatest for spectacular views and a unique perspective of Zion Canyon. This is a strenuous climb up to and into Echo Canyon, passing by steep drop-offs and Zion’s stunning Navajo sandstone. It’s longer and higher, but it’s also less busy and leads to some breathtaking canyon views.
Day 2 in Zion National Park
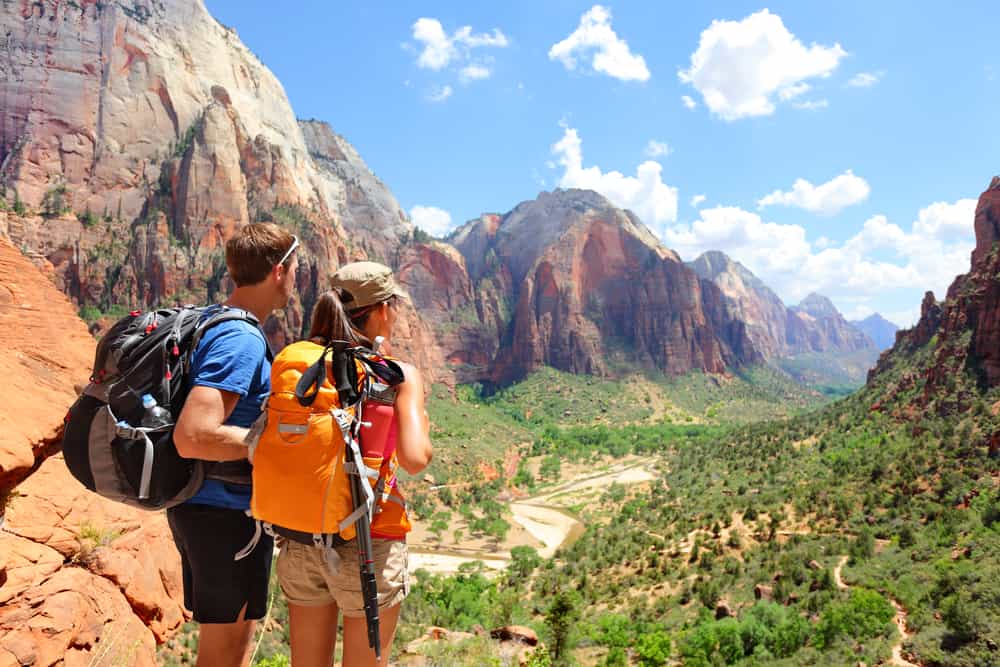
Angels Landing
Angels Landing in Zion National Park’s most popular and well-known hike, leading to one of the park’s most iconic sights.
This magnificent climb will take you to a breathtaking vantage point with a panoramic view of the canyon. This spectacular route begins with a series of switchbacks known as Walter’s Wiggles as it climbs the side of a mountain before traversing a small ridge to a 1,500-foot drop and a glimpse of the valley below.
At its highest points, you’ll be rock climbing to the top, with a precipitous drop-off on either side. Although the trek and vistas are amazing, all necessary safety precautions must be taken. The risk is real, so make sure you’re prepared.
This hike begins in the Grotto and takes three to six hours to complete. The trail is available all year, but it can be very hot and crowded in the summer and entirely covered in snow in the winter.
Weeping Rock
Weeping Rock is a well-known Zion National Park monument and a popular tourist destination. Water that has been slowly descending within the sandstone formations reaches an impervious layer of rock and is driven out the side, generating the “weeping.”
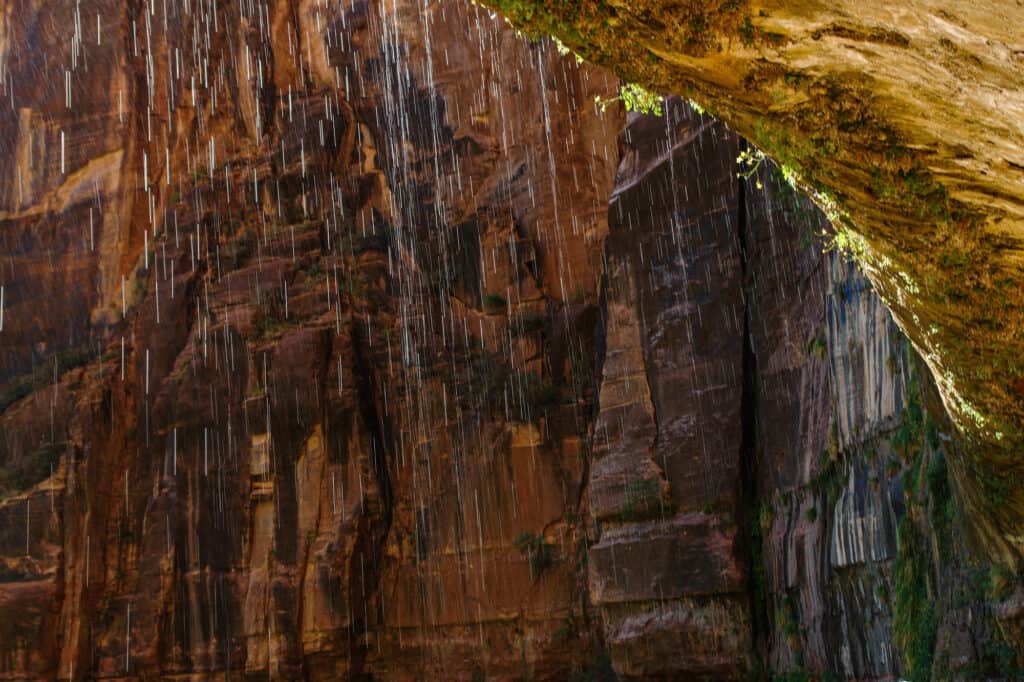
The weeping walls create a luxuriant hanging garden with a small flowing stream underneath them. While Zion has numerous weeping walls, this one is the most well-known, with a paved trail and a platformed viewing area built beneath the alcove in the park’s early days.
The hike to Weeping Rock is a short, family-friendly 10-minute walk. Walk up the parking lot from the Weeping Rock Trailhead, which is the 7th stop on the Zion Canyon Shuttle, cross the short hiker’s bridge, and then turn left to trek up the paved trail to the viewing area.
Soon enough, you’ll be standing beneath the lovely alcove, with the lovely water cascading from above; it’s the ideal setting for young and elderly alike. While the trail is paved, it is not wheelchair accessible due to the steepness of the trail and the presence of some steps near the end.
Drive the Zion-Mount Carmel Highway
Highway to Mount Carmel The Zion-Mount Carmel Highway is 40 square miles long, stretching from the South Entrance of Zion National Park to the Mount Carmel Junction with US Route 89.
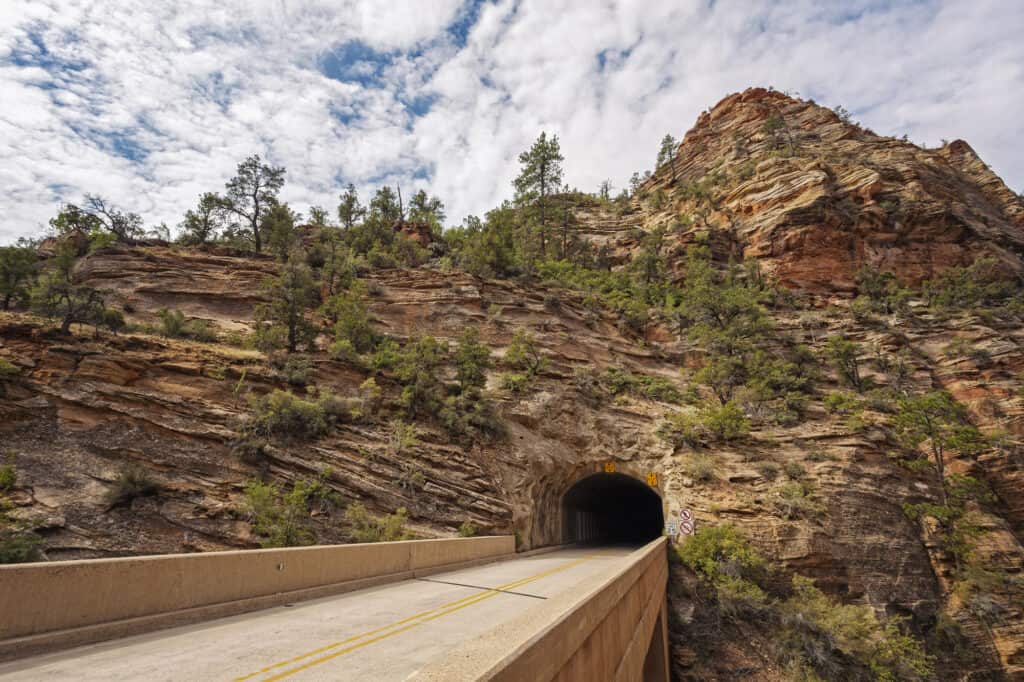
It was built in 1930 to improve park accessibility and connect visitors to Bryce Canyon, the Grand Canyon, and Zion National Park.
The route follows the cliff wall as it rises the mountainside. After a steady climb, the route passes through a narrow 1.1-mile tunnel. When RVs enter the tunnel, traffic is diverted in one direction since the tunnel is too narrow for them to travel through. RV drivers must pay a fee before entering the park and receive a pass ahead of time to pass through the tunnel.
The Canyon Overlook Trail, a one-mile round-trip climb to a magnificent outlook across the valley, is immediately after exiting the tunnel on the east side. Beyond this point, the environment changes to undulating ridged mountains with orange and cream tones.
Day 3 at Zion National Park
It’s time to visit the Kolob Canyon trails in the park’s northern section, which are less well-known. You’ll find fewer people here, and you’ll have more time to take in the scenery with fewer distractions.
Check the namesake arch, which is also the world’s second-largest arch, along the Kolob Arch Trail if you’re looking for a great lengthy hike to round out your holiday. If your legs have had enough, head to Taylor Creek, which features historic cabins and a double arch finale.
The 5-mile round trip hike along Taylor Creek is significantly shorter than Kolob’s 14-mile trek, so you have two excellent options in terms of distance, features, and beauty.
Kolob Arch
Deep within a side canyon leading into La Verkin Creek Canyon sits one of the world’s finest freestanding arches. Overlooking a heavily forested grotto, Kolob Arch spans 287 feet across open space.
The comparatively peaceful limits of La Verkin Creek and Timber Creek Canyons make this path across La Verkin Creek Canyon perfect for a relaxing backpacking trip or a challenging day hike.
There are two routes to get to the arch. Hikers can enter the drainage that eventually becomes Timber Creek from the Kolob Canyons Road parking lot near Lee Pass, which is the most popular option.
Hikers then make their way into the La Verkin Creek valley, looping around Gregory Butte’s southwest offshoot. The Kolob Arch viewpoint is located up the short canyon to the north of the La Verkin drainage, just before the trail turns into the Hop Valley Trail.
Hikers can alternatively start their journey near the intersection of Kolob Road at the Hop Valley Trailhead. Although both routes are seven miles long, this one is the most direct (one way). After seven miles on Hop Valley Trail, turn west into the La Verkin drainage, and Kolob Arch will be northward, up the first small canyon.
Not interested in visiting Kolob Canyon? Check out these other hikes.
Fairyland Loop Trail
The Fairyland Loop is one of the park’s most immersive experiences, winding up, down, and among the hoodoos and canyons while also providing vistas of the surrounding area.
The trail resembles a magical fairyland, as the name suggests. Tall, orange hoodoos tower over you, green trees snuggled in-between areas of hoodoos.
If you’re lucky, snow off in the distance, creating a stunning contrast of colors on the hike. While it isn’t the shortest or simplest climb in the park, it is well worth the effort to see some views not seen from the park overlooks.
The 8-mile hike offers the unique experience of strolling through and among many of the park’s hoodoos, as well as the opportunity to observe distinctive features such as Tower Bridge, the Chinese Wall, and the Sinking Ship.
Hidden Canyon
Hidden Canyon is a deep and narrow “hanging canyon” located east of the Great White Throne. Hikers can continue as far as they want on the constructed trail, which climbs the east side of the main canyon, passes through a few ravines, and ends at the mouth of Hidden Canyon.
With over 1000 feet of elevation gain, some exposed sections, and plenty of rock scrambling in Hidden Canyon, this trek is fairly tough. Depending on how much you hike, it could take anywhere from 3 to 6 hours.
Start your climb on the east side of the main canyon by walking up the paved trail that runs parallel to it. Proceed on the trail, which leads to sandy switchbacks with spectacular views. Along the trail, you’ll come across little sandstone caverns and a 20-foot natural arch.
On the trail, there are some extremely steep thin-tracked rock sections. Despite the presence of chains in some spots to protect hikers, all hikers should be cautious. For those who are afraid of heights, some sections may be challenging.
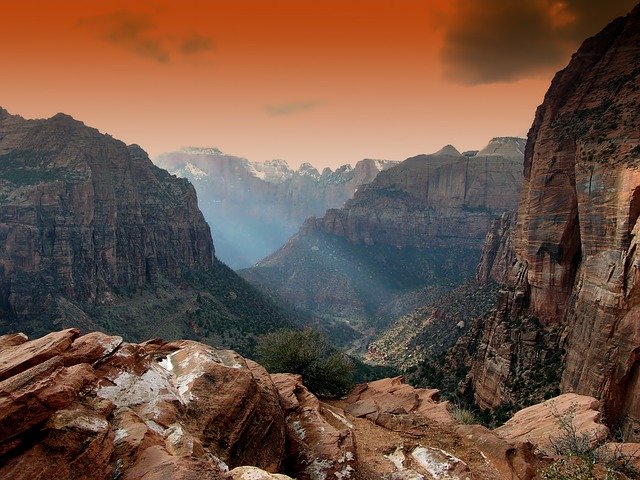
Best Views in Zion National Park
Observation Point
Observation Point is near the Narrows and Angels Landing in Zion Canyon’s north end. Due to a rockslide, you can no longer access this trail from the canyon, forcing you to travel outside of the park to see this iconic and spectacular view.
At 6,521 feet above sea level, Observation Point offers a panoramic view of Zion Canyon, including the popular Angels Landing, The Organ, Great White Throne, and the lower Zion Canyon with the Virgin River running through it.
This eight-mile round-trip climb is one of the greatest for spectacular views and a unique perspective of Zion Canyon. This is a strenuous climb up to and into Echo Canyon, passing by steep drop-offs and Zion’s stunning Navajo sandstone. It’s longer and higher, but it’s also less busy and leads to some breathtaking canyon views.
Angels Landing
Angels Landing in Zion National Park’s most popular and well-known hike, leading to one of the park’s most iconic sights. This magnificent climb will take you to a breathtaking vantage point with a panoramic view of the canyon. This spectacular route begins with a series of switchbacks known as Walter’s Wiggles as it climbs the side of a mountain before traversing a small ridge to a 1,500-foot drop and a glimpse of the valley below.
At its highest points, you’ll be rock climbing to the top, with a precipitous drop-off on either side. Although the trek and vistas are amazing, all necessary safety precautions must be taken. The risk is real, so make sure you’re prepared.
This hike begins in the Grotto and takes three to six hours to complete. The trail is available all year, but it can be very hot and crowded in the summer and entirely covered in snow in the winter.
Canyon Overlook
This one-mile climb off the Zion-Mount Carmel Highway takes you to a high vantage point with magnificent valley views. Curving around the side of a mountain, hugging the cliff wall, swerving out onto a wooden walkway suspended over a drop-off, and affording amazing vistas around every bend, the trail itself is part of the attraction.
On your way to the viewpoint, you’ll enjoy a fantastic glimpse of the Pine Creek slot canyon. A beautiful sheltered nook with ferns growing out of the walls provides a welcome reprieve from the otherwise exposed route. Although the trail is reasonably flat and well-traveled, it has switchbacks, steps, and Slickrock despite its short length, earning it the moderate difficulty label. As a result, it is recommended that you wear appropriate hiking footwear.
The Canyon Overlook route is located on the Zion of Mt. Carmel (East) side of the par and is one of the most stunning and accessible viewpoints in all of Zion National Park.
Canyon Junction Bridge – A Great place for Sunset
Canyon Junction Bridge is one of the best places in Zion to see the sunset. This is a great place to watch the sunset because it’s so easy to get to and has such beautiful views! The bridge is located just before the intersection of Highway 9 and Zion Canyon Scenic Drive in the heart of Zion Valley. Alternatively, you can take the Pa’rus road from the main parking lot to the Canyon Junction bridge.
Visitors are welcome to drive here and watch the sunset. It’s best to arrive early because there will be a lot of photographers.
West Rim Trail
The West Rim Trail runs along the rim, providing views of Phantom Valley and the valleys below. The Telephone Canyon Trail serves as a shortcut between Potato Hollow and Cabin Spring, as well as a possible loop for hikers who arrive and exit the trailhead at the same time.
The trail begins a dramatic descent in elevation at Cabin Spring and drops 2,500 feet over 4.7 miles to the Grotto Picnic Area.
The lower portion of the West Rim Route that leads to the iconic Angels Landing trek is familiar to most visitors to Zion, but those willing to go farther up the path will be rewarded with even more amazing views as the trail winds its way through the magnificent sandstone formations.
The West Rim Trail is a 15-mile trail that connects Lava Point (Zion’s highest point) with the Grotto Trailhead in the park’s popular main canyon.